How to setup Python coding environment on macOS
A step by step beginner guide to setting up your mac for Python programming
A step by step beginner guide to setting up your Mac for Python programming
1.Prerequisite
Make sure following tools are installed
- Apple’s Developer Tools
- MacPorts Package Manager
If you don’t know what are these then don’t worry. Follow this beginner tutorial to install Apple’s Developer Tools and MacPorts.
Once installed, launch your terminal and type python3 --version (for older MacOS version < 12.3 run python --version) and it will show the system python version (Python 3.9.6 on Sonoma 14.2.1).
If you run which python3 (or which python for older versions) in the terminal then it will return /usr/bin/python3. This is the default python installed for macOS. This python is used by apple system. This is the system python and let’s forget about this python and and promise yourself to never look back at it again.
2. Install and setup Python
2.1 Install Python
There are many ways to install python on your Mac, but in this tutorial I will use MacPort package manager to install a new version of python.
Do not use python.org to install python!
You must be asking by now why not use system python instead of using a package manager to install a new one? The reason is simple. You may want to use different python version and update it in the future or use multiple python versions for your application development. You don’t want to mess with system python. The MacPort package manager will help to manage python (install, update, use multiple versions etc.) and other packages.
Let’s use MacPort. To check the available versions of python, run
1
port search --name --line --regex '^python\d*$'
It will return the output similar to this
1
2
3
4
5
6
7
8
9
10
11
12
13
python26	2.6.9	lang	An interpreted, object-oriented programming language
python27	2.7.18	lang	An interpreted, object-oriented programming language
python32	3.2.6	lang	An interpreted, object-oriented programming language
python33	3.3.7	lang	An interpreted, object-oriented programming language
python34	3.4.10	lang	An interpreted, object-oriented programming language
python35	3.5.10	lang	An interpreted, object-oriented programming language
python36	3.6.15	lang	An interpreted, object-oriented programming language
python37	3.7.17	lang	An interpreted, object-oriented programming language
python38	3.8.18	lang	An interpreted, object-oriented programming language
python39	3.9.18	lang	An interpreted, object-oriented programming language
python310	3.10.13	lang	An interpreted, object-oriented programming language
python311	3.11.7	lang	An interpreted, object-oriented programming language
python312	3.12.1	lang	An interpreted, object-oriented programming language
Choose the version you want to install. For this tutorial I will choose the 3.11 version. Run below command to install python 3.11
1
sudo port install python311
It will ask for your password and then the permission to install all other dependencies for python.
1
2
3
4
5
6
7
8
9
10
11
12
13
14
15
16
17
18
19
20
21
22
23
--->  Computing dependencies for python311
The following dependencies will be installed:
 bzip2
 expat
 gettext
 gettext-runtime
 gettext-tools-libs
 gperf
 libedit
 libffi
 libiconv
 libtextstyle
 openssl
 openssl3
 pkgconfig
 python3_select
 python3_select-311
 python_select
 python_select-311
 sqlite3
 xz
 zlib
Continue? [Y/n]: y
Type y and wait for it to install (it will take a while). Once its installed, in the terminal run
1
python3.11 --version
and you will see the version installed by python (Python 3.11.7).
Let’s make this new version the default python by executing
1
 sudo port select --set python3 python311
Run which python3 in the terminal and you will see that the default python is now /opt/local/bin/python3.
In the terminal type python3 (or python3.11) and hit return. You should see python REPL (Read, Evaluate, Print, Loop)
1
2
3
Python 3.11.7 (main, Jan  5 2024, 00:17:30) [Clang 15.0.0 (clang-1500.1.0.2.5)] on darwin
Type "help", "copyright", "credits" or "license" for more information.
>>>
Type exit() or quit() to get out of REPL.
2.2 Install pip
pip is a package manager for python. Let’s install it
1
sudo port install py311-pip
To install a python package, for e.g. Django, you can run
1
pip-3.11 install django
To make pip-3.11 the default pip3, run
1
sudo port select --set pip3 pip311
Now you can use just pip3 instead of pip-3.11
1
pip3 install django
2.3 Install python virtual environment wrapper
It is a best practice to use virtual environments when working on python projects. This gives you the flexibility to use different versions of same package/library for different python projects/applications. (Read more on official doc).
venv is installed by default with python. To confirm, run
1
python3 -m venv -h
To manage virtual environment we will install another python package called virtualenvwrapper. We will install virtualenvwrapper using pip3
1
pip3 install virtualenvwrapper
Open ~/.bash_profile file
1
nano ~/.bash_profile
and paste these lines at the end of the file
1
2
3
4
5
6
7
8
########## Start 'virtualenvwrapper' Setup ############

export VIRTUALENVWRAPPER_PYTHON=/opt/local/bin/python3
export WORKON_HOME=$HOME/.virtualenvs
export VIRTUALENVWRAPPER_VIRTUALENV=~/Library/Python/3.11/bin/virtualenv
source ~/Library/Python/3.11/bin/virtualenvwrapper.sh

########## End 'virtualenvwrapper' Setup   ############
Press keys ⌃ control + X and then press y to save. Relaunch the terminal and then run mkvirtualenv myvenv to create a virtual environment myvenv. To start working with this virtual environment run the command workon myvenv. If everything is installed properly then this virtual environment will be activated. To deactivate it, run deactivate. Read more about virtualenvwrapper and how to use it on official doc.
3. Installing and using Visual Studio Code
3.1 Install VS Code
Download Visual Studio Code source code editor from its official site. Extract the executable and move it to the application folder.
Create a folder named hello and navigate to it and launch VSC (By starting VS Code in a folder, that folder becomes your “workspace”. Read more on official doc)
1
2
3
mkdir hello
cd hello
code .
VS Code comes with hundreds of free extensions. For this tutorial we will install only two extensions, Python and Pylance. Click on extension button on the activity bar and install Python and Pylance extensions.
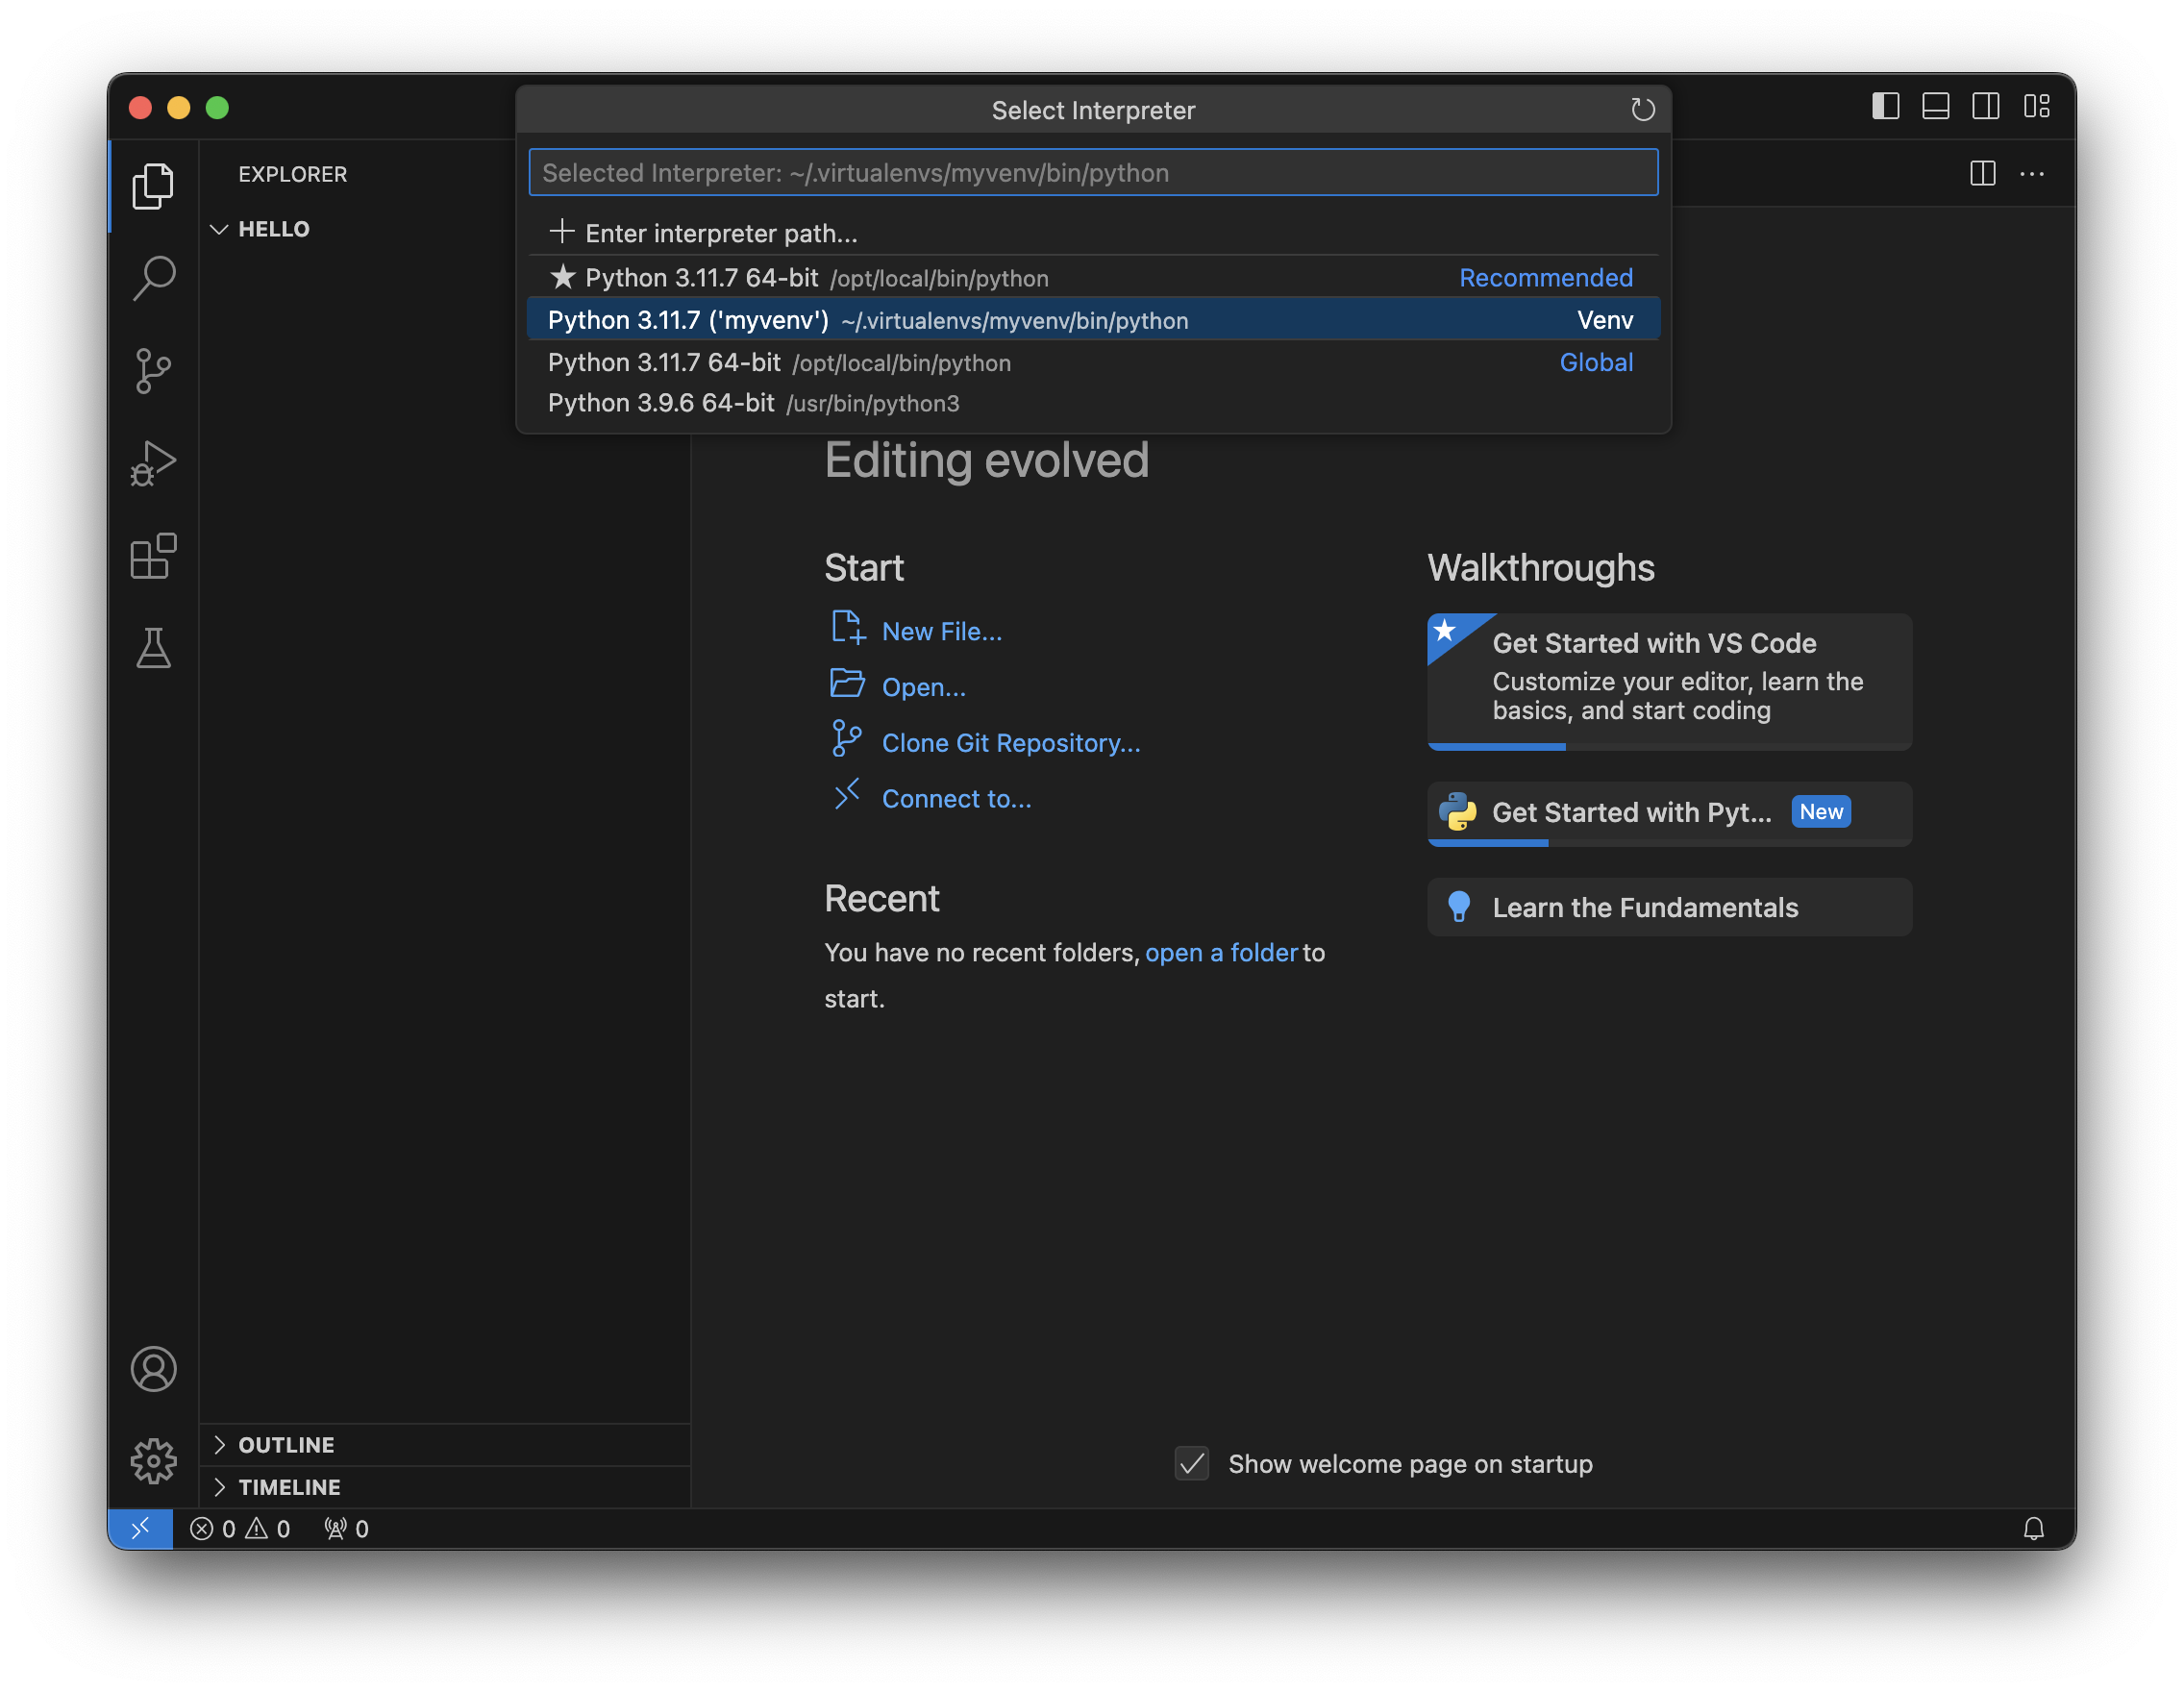
3.2 Select a virtual environment in VS Code
You can create new virtual environments in VSC using Command Palette, but we have already created one in step #3 and therefore we will use that one. Type ⌘ command+shift+P to open Command Palette. Type Python: Select Interpreter and select it. Then choose the python interpreter from myvenv (Python 3.11.7 (‘myvenv’)).
Now create a new code file hello.py in hello directory and write a line print("Hello, World!) in it. Click the play button in the top-right side of the editor to run the python code.
Congratulations! You have just created your first python project.
Visual Studio Code comes with integrated source control and includes git support. Alternatively you can download GitHub Desktop (https://desktop.github.com/) that also comes with integrated git. If you are using any one of these then skip step #5
4. Setting up a GitHub account
Follow this step by step tutorial to setup git and github on Mac: How to setup git and github on Mac OS?.